Friday, April 24, 2009

Backing up our memories

You better watch out, you better not cry, you better not pout, I'm telling you why, because your hard drive will crash when you least expect it and need it the most!

I typically maintain a monthly differential backup for my work, however, I procrastinated a couple of months and in effect have lost hundreds of digital images that I will never see again. These "lost" files included all of the images I have taken in the past 8-10 weeks including my grandson's first birthday party, not to mention several special images that I was currently working on.

On the bright side, all was not lost as I have rediscovered images I deleted on another drive from several years ago -- like finding old rolls of undeveloped film back in the old days you long forgot about. :)


I have also talked with my daughter about contacting others who attended my grandson's birthday who were taking pictures and hopefully will find some cherished images of that memorable and special day!

I have subsequently installed Norton's "Ghost" program which can back up not only your important images and files but your entire drive, including operating system! Hopefully this new process will increase speed, efficiency and the obvious redundancy will be comforting. I will review Norton Ghost in a future post for any who may be looking for more protection with their digital images.


Keeping Perspective: Thanks to my friend Stacey Childs for the above reminder. For all who need an inspirational boost, watch the video.... you'll be glad you did.

Stacey is editor of the online digital magazine "Disco Underworld"; a wonderful online digital magazine for both the artist and photographer alike. If you haven't seen Disco Underworld you can check them out at http://www.discounderworld.com.

Wednesday, April 15, 2009

Alternative use for the Gradient Tool

In a recent post I refer to the use of the gradient tool as more of an art form than a science. I recently began experimenting with this fun and powerful tool and have discovered another way to enhance an image to bring out richness in a sky that may have been lacking in the original.

The first image shown was taken of an old bridge crossing the North Platte River in Nebraska. As can be seen, the image has a washed out look and an absence of contrast. There are several other means of improving upon this shot but I wanted to see what could be done using the gradient tool in Photoshop. The results are similar to what could have been accomplished shooting with a polarize lens, however you will lose a stop or two of light and some other adjustment or modification would have to be made, not to mention you may not have access to one.


Here are the steps I took in this new process to enhance the first image. As always, it's a good habit to back up your image prior to any post-production work.

  1. Create a layer copy using the shortcut Control-J on a PC.
  2. Add a layer mask located on the pallet box, second icon on the bottom.
  3. Go to the blend mode and check Multiply. This will darken the entire image. The sky now looks better but the foreground will be darkened as well.
  4. Go to your toolbox and select the Gradient tool. Start from the bottom of the image and drag the gradient slowly upwards ending at the section you want to lighten. You may want to make several passes before you find the right balance you like.
  5. I used the Dodge and Burn tool to add additional touches of light and shade to the foreground. Had the subject been a face I probably would have used the Brush tool instead. Just make sure if you brush, that you have the Black over White selected in your toolbox to lighten.
  6. Go to the top of your toolbar and select Layers and then move down to Flatten Image.
  7. Save your file and that's it! I did remove a few small unwanted items using the Patch tool, but that's all it took to pickup at least one full stop of light, if not more, for this blue sky.

Monday, April 6, 2009

Photographer Vivian Bedoya

Vivian Bedoya is a New Jersey based photographer who shoots purely for the freedom of expression it allows her and for the joy of getting close to nature and beauty. Vivian has shown her beautiful work around the "Garden State", including an art gallery, the New Jersey’s Somerset County Park Commission, and at a public library. She has published images online and print media as well.

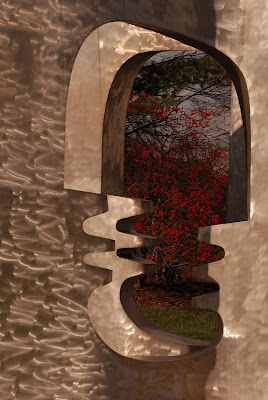
One recent example is a photograph, "Portal", currently hanging in a gallery at the Grounds For Sculpture in Hamilton, NJ which received a "Honorable Mention Award: Focus On Sculpture, 2009!"

During a recent park visit, Vivian was encouraged by an employee of the grounds to enter an image in their competition, "Focus on Sculpture." Vivian had exhibited work before, but she never considered entering a competition. Now came the arduous task of selecting the best image to submit for this contest.

"Choosing a subject for exhibition can be very difficult," she recently wrote. "It often comes down to trusting your intuition. For this competition, I chose three images, had them printed and framed, then compared the results. In the end, the choice I submitted was based on instinct. It was the one photo that had the elements they were looking for, it featured a detail of one of the works at the sculpture park and it also had something else, which at first seemed intangible. The park is known for its combination of man-made and natural art; it combines beautifully landscaped grounds and interesting pieces of sculpture of all styles into one cohesive and mutually enhancing whole. My photograph did the same. It showed the detail of the sculpture, through which could be seen a tree, blooming bright red with berries. I thought it was the perfect representation of the theme and my “critics” (family and one trusted friend) agreed."

With over 200 entries considered for this competition, only 33 were chosen for exhibition. Vivian said "I would have been happy with just having my photo hang in their gallery but I was elated when I was notified that it had won Honorable Mention. Along with a cash prize, a gift, a certificate, an artist’s reception and a three-month exhibition, it went beyond my wildest expectations."


She went on to say "There’s only one problem, though… how do I top that next year?"

I have no doubt Vivian's lovely work will be greatly admired and considered highly in next year's competition!

You can learn more about Vivian Bedoya and follow her work at the following links!

Vivian's Website
Flickr gallery
Wall Street Journal

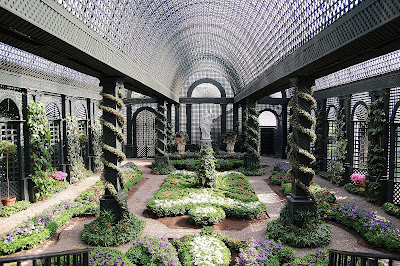
All of the images included in this post were taken by Vivian Bedoya and are copyrighted © Vivian S. Bedoya.

Wednesday, April 1, 2009

Photoshop post-production example

I receive a lot of mail regarding images I have posted on my JPG Magazine and Flickr accounts. The two most frequently asked questions I get are what kind of camera do I shoot with and what software do I use. I thought I would answer those questions in this post.

I own a Nikon D70 with an assortment of Nikkor lenses and use a SB-600 flash as a slave. I don't put a lot of faith in brand names like I use to and I'm more of a believer in the photographer's "eye" than the camera's make or model. My first 40 plus images uploaded on Flickr were all taken with a Kodak EasyShare CX4200 2MP camera.

As far as post-processing is concerned, I use Photoshop 7 on the majority of my images. I also use Paint Shop Pro for pixel pushing any images I plan on selling or printing in large format... just a personal preference.

I also have the program GIMP but have not used it much lately. I can accomplish much of the same results using GIMP as I do in Photoshop but prefer the latter. I enjoy experimenting with different editing software, but we are creatures of habit and find my working "comfort zone" in Photoshop.

For example, here is a shot I took in Nevada. I show the before and after images using a few common tools and methods in the post production process with Photoshop.
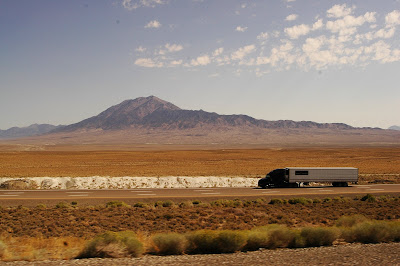
Driving in Nevada with a speed limit of 70 mph in an 18-wheeler can present some photographic challenges. The above scene was shot without any filters, and camera movement is obvious in the above foreground. Incidentally, camera settings included 1/320 sec. exposure, an aperture of f/9 at a focal length of 100mm. I will mention here as well I almost always shoot landscapes with a white balance in "shade" mode with a fine tune of -3.
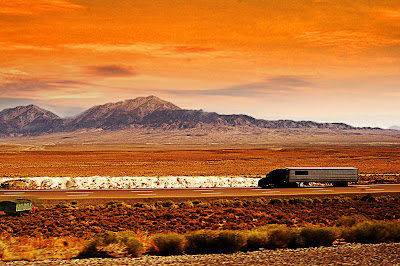

As you see there is big difference between these two images. The post-processed one includes the following procedures:

  1. Light Levels were adjusted for correction in the darker areas.
  2. A duplicate layer was created to include a hard overlay and a high pass filter was applied followed by a merge of the background layer.
  3. After saving the changes, a copy was made to a separate directory.
  4. Another totally different image was opened of a sunset sky I had in my archives and was added to the active shot by using the move tool. Proper alignment of this procedure in my opinion is crucial.
  5. A layer mask was added.
  6. The gradient tool was used next and this is more of an art than a science. Play with this for awhile until you feel comfortable and you will discover many amazing results.
  7. Using the clone tool I added the little truck in the far left corner and added another mountain to the background for aesthetics and balance.
  8. Next I added a small degree of saturation to the full frame.
  9. And finally before saving the file to a jpg format, I applied the gaussian blur to the sky scene using the magic wand isolating this area to reduce unwanted noise.
This may seem like a lot of work if you are new to post production work, but once you become familiar with a few tools it becomes much easier and faster. The order of sequence is not too important, as the above is only my example. Master a few tools and you will develop your own style and techniques.

A special "Thanks" to Anna Theodora for her recent tip on the use of the gaussian blur tool! And I might add, truly one of my favorite photographers!

To the "purist" who feel post editing is somehow "cheating" in the world of photography--dodging, burning, super imposed exposures and cropping have been performed in the old school darkroom for ages, I leave with this quote in the words of photographer Duane Michals.

"Photography deals exquisitely with appearances, but nothing is what it appears to be."

Have fun and if you have any questions about the above images contact me at slimeface2009[at]yahoo.com and I will try to answer them.